
Kenmore Gas Stove Instruction Manual: A Comprehensive Guide
Welcome! This manual provides essential guidance for safe and efficient operation of your new Kenmore gas stove, ensuring years of reliable performance.
Congratulations on selecting a Kenmore gas stove! This appliance is designed to deliver exceptional cooking performance and reliability for your culinary adventures. Before you begin, please take a few moments to familiarize yourself with this instruction manual.
This guide contains detailed information regarding the safe operation, maintenance, and troubleshooting of your new stove. We’ve included clear instructions and helpful tips to ensure you get the most out of your appliance.

Kenmore is committed to providing high-quality home appliances, and your gas stove is no exception. We understand the importance of a dependable kitchen companion, and we’ve engineered this stove with durability and user-friendliness in mind. Enjoy exploring its features and creating delicious meals!
Safety Precautions – Read Before Use
Important Safety Information: Your safety is paramount. Before operating this Kenmore gas stove, carefully read and understand all warnings and instructions within this manual. Failure to follow these guidelines could result in personal injury or property damage.
This appliance utilizes flammable gas; therefore, proper ventilation is crucial. Never obstruct the ventilation openings. Keep combustible materials away from the stove’s vicinity. Always supervise children when the stove is in use.
Regularly inspect the gas supply connections for leaks. If you smell gas, immediately shut off the gas supply and contact your local gas company; Do not attempt to repair the stove yourself; contact a qualified technician for any repairs. Prioritize safety at all times!
General Safety Warnings
Caution: This Kenmore gas stove becomes hot during and after use. Avoid touching heating surfaces or oven interior until completely cool. Use oven mitts or pot holders when handling hot cookware. Never leave the stove unattended while in operation.
Do not use abrasive cleaners or scouring pads on the cooktop or oven surfaces, as they may cause damage. Ensure proper grounding of the appliance. Never modify or alter the stove in any way. Keep the area around the stove clear of flammable liquids and materials.
Always exercise caution when opening the oven door, as hot steam may escape. Regularly check for any signs of damage or wear and tear. Disconnect the gas supply before performing any maintenance or cleaning. Prioritize a safe cooking environment.
Carbon Monoxide Awareness
Critical Safety Information: Carbon monoxide (CO) is a colorless, odorless gas produced by incomplete combustion of fuels like natural gas or propane. This Kenmore gas stove can produce CO if not properly ventilated.
Symptoms of CO poisoning include headache, dizziness, weakness, nausea, vomiting, chest pain, and confusion. Install a CO detector near the stove and in sleeping areas. Test the detector regularly, following manufacturer’s instructions.
Ensure adequate ventilation when using the stove. Never use the oven for heating your home. If you suspect CO poisoning, immediately evacuate the premises and call emergency services. Regular maintenance by a qualified technician is crucial for safe operation and preventing CO buildup.
Child Safety Considerations
Important: This Kenmore gas stove presents potential hazards for children. Never leave children unattended near the stove while it is in use or immediately after, as surfaces remain hot for a considerable time.
Supervision is key. Teach children about the dangers of touching hot surfaces, knobs, or oven doors. Consider using stove knob covers to prevent accidental activation. Keep flammable items, such as dish towels and paper products, away from the cooktop.
Establish a “kid-free zone” around the stove during cooking. Explain that the oven is not a play area. Regularly check the stove area for any toys or objects that could pose a hazard. Prioritize child safety at all times when operating this appliance.
Understanding Stove Components
Familiarization is crucial for safe and effective use of your Kenmore gas stove. This section details the key parts of your appliance, enabling you to operate it with confidence.
The cooktop features multiple burners, varying in BTU output for different cooking needs. Control knobs regulate gas flow to each burner and manage oven functions. Inside the oven, adjustable rack positions accommodate various dish sizes.
The broiler pan and rack are specifically designed for broiling meats and vegetables. Understanding the purpose of each component – from the igniter to the oven temperature sensor – will enhance your cooking experience and ensure optimal performance. Refer to the following sections for detailed explanations of each part.
Burner Overview (Types & Functions)
Kenmore gas stoves typically feature a variety of burners designed for diverse cooking tasks. You’ll find standard burners for everyday cooking, alongside a powerful Power Burner for rapid boiling and searing. Some models include a simmer burner, providing low, consistent heat for delicate sauces and slow cooking.
Burner size directly correlates to BTU output – larger burners deliver more heat. The sealed burners prevent spills from entering the gas valve, enhancing safety and simplifying cleaning. Each burner is equipped with an igniter, sparking to ignite the gas flow when a control knob is activated.
Understanding the specific function of each burner allows for efficient and precise cooking, maximizing your stove’s capabilities.
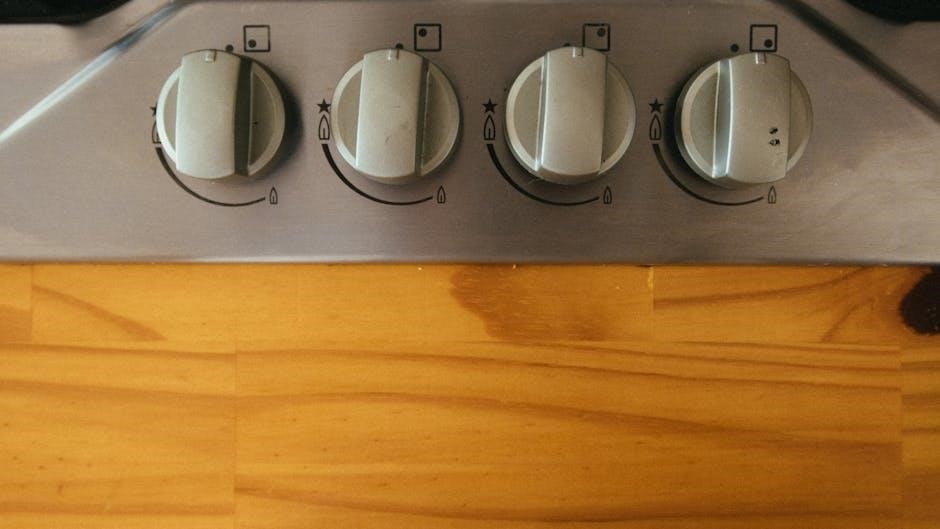
Control Knobs – Functionality Explained
Kenmore gas stove control knobs are designed for intuitive operation. Each knob corresponds to a specific burner or oven function. Rotating the knob clockwise increases the gas flow, resulting in a higher flame or oven temperature. Most knobs feature clear markings indicating ‘Off’, ‘Lite’, and temperature/heat settings.
For burners, the ‘Lite’ position often initiates electronic ignition. Once lit, continue pressing and turning the knob to your desired heat level. The oven knob controls both temperature and cooking mode (Bake, Broil, etc.).
Ensure knobs are firmly seated when not in use to prevent accidental gas flow. Regularly check for smooth rotation; stiff knobs may indicate a cleaning need.
Oven Rack Positions & Usage
Kenmore gas ovens typically feature multiple rack positions, numbered from the bottom up. Position 1 (lowest) is ideal for broiling, placing food closest to the broiler element. Positions 2 and 3 are versatile for baking cookies, casseroles, and roasting meats. Position 4 (highest) is best for smaller items or when using multiple racks simultaneously.
Avoid overcrowding the oven; allow for proper air circulation. When baking on multiple racks, stagger placement for even cooking. Always ensure racks are securely seated in the rack supports before placing food inside.
Refer to your recipe for specific rack position recommendations. Adjust rack placement based on the size and type of food being cooked for optimal results.
Broiler Pan & Rack – Proper Use
The broiler pan and rack are essential for safe and effective broiling. Always use both components together. The pan catches drippings, preventing flare-ups and simplifying cleanup, while the rack elevates the food, allowing fat to drain and ensuring even cooking.
Position the rack within the broiler pan and place the pan in the designated broiler compartment. Ensure the oven door is slightly ajar during broiling to prevent overheating and maintain proper ventilation. Never line the broiler pan with foil, as this can trap heat and cause a fire hazard.
Monitor food closely while broiling, as it cooks rapidly. Use tongs to turn food, avoiding piercing it with a fork.
Getting Started: Initial Setup
Before your first use, several setup steps are crucial for optimal performance and safety. First, ensure a qualified technician has properly connected the stove to your gas supply – do not attempt this yourself! Following connection, inspect the hose for any damage or leaks using a soapy water solution.
Next, perform an initial burner test. Turn each burner to the ‘light’ or ‘high’ setting and verify consistent, blue flames. If flames are yellow or unstable, contact a service professional. Finally, set the clock according to the current time. Familiarize yourself with the timer functions for convenient cooking management.
Connecting to Gas Supply (Professional Installation Recommended)
Gas connection is a critical step and must be performed by a licensed and qualified gas appliance installer. Improper installation can lead to dangerous gas leaks, fire, or explosion. Do not attempt self-installation! The installer will verify proper gas type compatibility (natural gas or propane) and ensure correct pressure regulation.
They will connect a flexible gas connector or rigid pipe to the stove’s gas inlet, using pipe joint compound approved for gas lines. After connection, a leak test using a soapy water solution is mandatory. Bubbles indicate a leak; immediately shut off the gas supply and call the installer. Always follow local gas codes and regulations.
Initial Burner Test – Ensuring Proper Ignition
After gas connection, and before first use, thoroughly test each burner for proper ignition and flame characteristics. Begin by pushing in and turning a control knob to the “LITE” or “HIGH” position. For models with electronic ignition, you should hear a clicking sound. Observe if the burner ignites within a few seconds.
If it doesn’t, repeat the process. If still unsuccessful, consult the “Troubleshooting” section. Check the flame; it should be blue with a yellow tip. A consistently yellow or flickering flame indicates incomplete combustion and requires professional adjustment. Test each burner individually, verifying consistent ignition and flame quality across all positions.
Setting the Clock & Timer Functions
Your Kenmore gas stove features a digital clock and timer for convenient cooking management. To set the clock, press and hold the “Clock” button until the hour digits flash. Use the number pads to enter the correct hour, then press “Clock” again. Repeat for minutes. The clock displays in 12 or 24-hour format, selectable via the “Format” button.
The timer function allows you to set a countdown for cooking tasks. Press “Timer,” enter the desired time using the number pads, and press “Start.” The timer will beep when the set time elapses. Some models offer a delayed start function; consult your specific model’s features for details. Accurate time setting is crucial for utilizing timed baking and self-cleaning features.
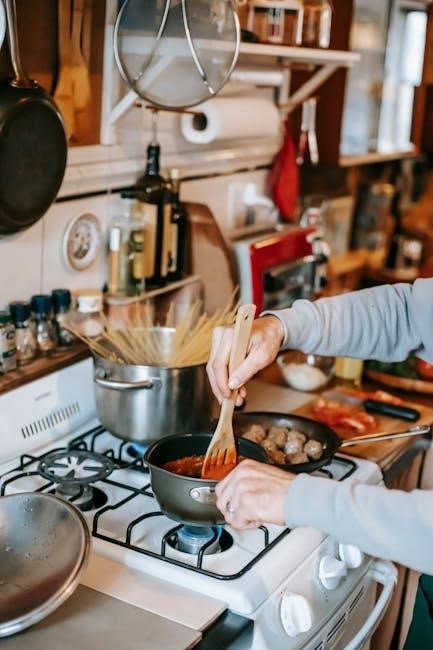
Operating the Cooktop
The Kenmore gas cooktop offers precise heat control for various cooking needs. Before use, ensure burner caps and grates are correctly positioned. To ignite a burner, push in and turn the corresponding control knob to the “Light” or “High” position. For models with electronic ignition, you’ll hear a clicking sound. If it doesn’t light, repeat the process or refer to the troubleshooting section.
Once lit, adjust the flame size by turning the knob between “High” and “Low.” A lower flame is ideal for simmering, while a higher flame is best for boiling or searing. Always use cookware that is appropriately sized for the burner. Never leave a lit burner unattended. Remember to turn off burners completely when finished cooking.
Lighting a Burner – Manual & Electronic Ignition
Your Kenmore gas stove features either manual or electronic ignition. Electronic Ignition: Simply press in and rotate the control knob to the “High” or “Light” position. You should hear a clicking sound as the igniter sparks. If the burner doesn’t light within a few seconds, continue holding the knob in and try again.
Manual Ignition (if equipped): Locate the pilot light opening near the burner. Hold a lit match or long-handled lighter near the pilot while simultaneously pressing in and turning the control knob to “Light.” Once the pilot ignites, continue holding the knob for a few seconds before releasing. If the pilot won’t stay lit, consult the troubleshooting section.
Adjusting Flame Size – Achieving Desired Heat
Precise flame control is key to successful cooking. After lighting a burner, you can easily adjust the flame size by rotating the control knob. Turning the knob clockwise increases the flame (higher heat), while turning it counterclockwise decreases the flame (lower heat).
For delicate simmering, turn the knob to the lowest setting. A small, steady flame is ideal for preventing scorching. For rapid boiling or searing, use the highest flame setting. Observe the flame – a vibrant blue flame indicates efficient combustion. A yellow or orange flame may indicate incomplete combustion and requires attention (see troubleshooting).
Simmering & High-Heat Cooking Techniques
Simmering requires maintaining a gentle heat to cook foods slowly and evenly. Utilize the lowest flame setting and consider using a diffuser plate for exceptionally delicate sauces or foods prone to sticking. Consistent monitoring is crucial to prevent burning.
High-heat cooking, perfect for searing meats or stir-frying vegetables, demands a rapid temperature increase. Employ the highest flame setting and ensure your cookware is preheated. Avoid overcrowding the pan, as this lowers the temperature and results in steaming instead of searing. Remember to use appropriate ventilation when cooking at high heat.
Operating the Oven
Your Kenmore gas oven offers versatile cooking options. Before operation, ensure the oven racks are positioned correctly for your desired dish. Preheat the oven to the specified temperature – a preheated oven ensures consistent results. Utilize the control panel to select your desired cooking mode: Bake, Broil, or Self-Clean.
Always use oven mitts when handling hot cookware. Avoid opening the oven door frequently during baking, as this releases heat and extends cooking time. For optimal performance, allow sufficient space around the oven for proper ventilation. Refer to specific recipe instructions for recommended temperatures and cooking durations.
Setting Oven Temperature – Accurate Control
Achieving precise oven temperature is crucial for successful baking and roasting. Your Kenmore gas stove utilizes a digital control panel for accurate temperature setting. Press the “Bake” button, then use the up and down arrow keys to select your desired temperature in Fahrenheit or Celsius – the display will show your selection.
Confirm your setting by pressing the “Start” button. The oven will begin preheating, and the display will indicate the current temperature and the target temperature. Allow the oven to fully preheat before placing food inside for optimal results. Note that slight temperature variations may occur, so monitoring is advised.
Bake Mode – Standard Baking Operations
Bake mode is your go-to setting for most conventional baking tasks – cakes, cookies, casseroles, and more. After setting the desired temperature (refer to the previous section), ensure you’ve selected “Bake” on the control panel. Position your oven rack appropriately based on your recipe; generally, the middle rack is ideal for most baking.
Preheating is essential for even cooking. The oven will maintain a consistent temperature throughout the baking process. Avoid opening the oven door frequently during baking, as this can cause temperature fluctuations. Baking times will vary depending on the recipe; always consult your recipe for guidance. For best results, use oven-safe cookware.
Broil Mode – Using the Broiler Effectively
Broil mode utilizes high, direct heat from the top of the oven, perfect for browning, crisping, and quickly cooking foods. Always use the broiler pan and rack provided with your Kenmore stove; this ensures proper airflow and prevents grease splattering. Position the rack 4-6 inches from the broiler element for most foods, adjusting closer for faster browning or further for slower cooking.
Preheating the broiler for several minutes is crucial. Never leave the oven unattended while broiling, as food can burn quickly. For best results, use oven-safe cookware. Broiling is excellent for thin cuts of meat, vegetables, and melting cheese. Remember to vent your kitchen well, as broiling can produce smoke.
Self-Cleaning Cycle – Instructions & Precautions
The self-cleaning cycle utilizes extremely high temperatures to burn off food residue within the oven. Before initiating, remove all racks, cookware, and any loose debris. Ensure the oven door can fully lock; do not attempt to open it during the cycle. Select the desired cleaning duration – typically 2-4 hours – and press ‘Start’.
Important Precautions: Strong odors and smoke are normal during self-cleaning; ensure adequate ventilation. Keep children and pets away from the oven. Do not use oven cleaners in conjunction with the self-cleaning cycle. After the cycle completes and the oven cools, wipe away any remaining ash with a damp cloth. Avoid prolonged use of the self-clean feature.
Cleaning & Maintenance
Regular cleaning ensures optimal performance and longevity of your Kenmore gas stove. Daily wipe-downs of the cooktop with a mild detergent and water prevent buildup. For stubborn stains, use a non-abrasive cleaner. The oven benefits from frequent cleaning, utilizing either manual methods or the self-cleaning cycle (see section 4.4).
Burner maintenance involves removing and cleaning burner caps and grates to maintain efficient flame distribution. Control knobs should be wiped clean to prevent grease accumulation and ensure smooth operation. Always disconnect the gas supply before performing any major cleaning or maintenance. Refer to specific sections for detailed instructions on each component.

Cooktop Cleaning – Daily & Deep Cleaning

Daily cleaning involves wiping the cooktop with a soft cloth dampened with warm, soapy water after each use. This prevents grease and food particles from baking on. For deep cleaning, allow the cooktop to cool completely. Remove grates and burner caps. Wash them with warm, soapy water; a non-abrasive sponge is recommended.
Stubborn stains can be tackled with a cooktop cleaning cream, following the product’s instructions carefully. Avoid abrasive cleaners, as they can scratch the surface. Rinse thoroughly and dry with a clean cloth. Ensure all burner ports are clear of debris for optimal flame performance. Reassemble components only when completely dry.

Oven Cleaning – Manual & Self-Clean Options
Your Kenmore gas stove offers both manual and self-cleaning options. For manual cleaning, remove racks and use a non-abrasive oven cleaner, following the product’s safety guidelines. Wipe down interior surfaces with a damp cloth after the cleaner has sat for the recommended time.
The self-cleaning cycle utilizes high heat to burn off food residue; Remove racks before initiating. Ensure proper ventilation during the cycle, as it may produce odors. Lock the oven door during operation. After the cycle completes and the oven cools, wipe away any remaining ash. Caution: Do not use oven cleaners during a self-clean cycle.
Burner Cap & Grate Cleaning – Maintaining Efficiency
Regularly cleaning your Kenmore gas stove’s burner caps and grates is crucial for optimal performance. Remove the grates and burner caps after each use, allowing them to cool completely. Wash them with warm, soapy water, using a non-abrasive sponge or cloth. For stubborn residue, soak them in hot, soapy water for a period.
Ensure the burner ports are clear of debris; use a small wire or pin to gently unclog them. Thoroughly dry all components before reassembling. Important: Never use abrasive cleaners or place grates/caps in the dishwasher. Proper cleaning ensures even flame distribution and prevents inefficient burning, maximizing your stove’s efficiency.

Control Knob Cleaning – Preventing Malfunctions
Maintaining clean control knobs is vital for the smooth operation of your Kenmore gas stove. Over time, grease and food particles can accumulate around the knobs and their stems, leading to sticking or inaccurate temperature settings. To clean, gently pull each knob straight off the stove.
Wash the knobs with warm, soapy water and a soft cloth. Avoid submerging the knobs completely, as this could damage the internal mechanisms. For stubborn grime, use a mild degreaser. Crucially, ensure the knobs are completely dry before reattaching them. Regularly cleaning prevents malfunctions and ensures precise control over your cooking.
Troubleshooting Common Issues
This section addresses frequent problems you might encounter with your Kenmore gas stove. Before contacting service, review these solutions. If a burner won’t light, check the gas supply and ensure the igniter is clicking. A dirty burner port can also be the culprit – clean it carefully.
If the oven isn’t heating, verify the temperature setting and ensure the bake element isn’t damaged. Error codes displayed on the control panel indicate specific issues; consult the detailed error code list in the appendix for diagnosis and resolution steps. Always disconnect power before attempting any repairs beyond basic cleaning.
Burner Won’t Light – Possible Causes & Solutions
Several factors can prevent a burner from igniting. First, verify the gas supply is turned on at the valve. Next, check if the burner ports are clogged with food debris; clean them with a thin wire or needle. Ensure the igniter is clicking when the knob is turned – if not, the igniter may be faulty and require replacement.
A wet burner can also prevent ignition; allow it to dry completely. If using electronic ignition, a power outage could be the issue; For models with a pilot light, confirm the pilot is lit. If problems persist, consult a qualified technician. Never attempt to repair gas lines yourself.
Oven Not Heating – Diagnostic Steps
If your oven isn’t heating, begin by verifying the power supply and ensuring the oven is properly connected. Check that the temperature is set correctly and the bake or broil mode is selected. Next, inspect the igniter; it should glow brightly before the burner ignites. A weak or non-glowing igniter often indicates a faulty component needing replacement.
Also, examine the gas valve – a qualified technician should assess its functionality. A faulty oven temperature sensor can also prevent heating. If the control panel displays an error code, refer to the “Error Codes” section; Do not attempt to disassemble gas components; always consult a professional for repairs.
Error Codes – Understanding & Resolving
Your Kenmore gas stove utilizes error codes to diagnose potential issues. Error code E1 typically indicates a failed igniter, requiring replacement by a qualified technician. Code E2 suggests a problem with the gas valve, also needing professional attention. E3 often signals a temperature sensor malfunction, impacting oven temperature accuracy.
Error code F1 may point to a control board issue, while F2 could indicate a gas supply problem. Always disconnect power before attempting any troubleshooting beyond verifying the error code. Refer to the complete error code list in the appendix for a detailed explanation of each code and potential solutions. Do not attempt repairs if you are uncomfortable or unqualified; contact authorized service personnel.
Warranty Information & Support
Your Kenmore gas stove is covered by a one-year limited warranty against defects in materials and workmanship from the date of purchase. This warranty covers parts and labor for repairs performed by authorized service providers. Please retain your proof of purchase for warranty claims. The warranty does not cover damage resulting from misuse, accidents, or improper installation.
For warranty service or support, please visit www.kenmore.com/support or call our customer service line at 1-800-4MY-HOME (1-800-469-4663). Our knowledgeable representatives are available to assist you with any questions or concerns. You can also find helpful FAQs and troubleshooting tips online. Extended warranty options may be available for purchase.