
Power Flame Burner Manual: A Comprehensive Guide
Welcome! This manual details safe operation, installation, and maintenance of your Power Flame burner, ensuring optimal performance and longevity.
Power Flame burners are renowned for their robust design and efficient combustion, serving a diverse range of industrial heating applications. These burners are engineered to deliver reliable performance in processes like steam generation, hot water heating, and thermal fluid heating.
Utilizing various fuel types – natural gas, propane, oil, and even alternative fuels – Power Flame offers customizable solutions to meet specific operational needs. Their advanced control systems ensure precise flame control, maximizing efficiency and minimizing emissions.
This manual provides comprehensive guidance for owners, operators, and maintenance personnel. Understanding the principles of operation, safety protocols, and proper maintenance procedures outlined herein is crucial for maximizing the lifespan and ensuring the safe, efficient operation of your Power Flame burner system.
Safety Precautions

Prioritizing safety is paramount when working with Power Flame burners. These systems involve high temperatures, flammable fuels, and electrical components, demanding strict adherence to safety guidelines. Always disconnect power and fuel supplies before performing any maintenance or inspection.
Ensure adequate ventilation to prevent the buildup of combustible gases. Never operate a burner with damaged components or safety devices. Personnel must be properly trained on burner operation, safety procedures, and emergency shutdown protocols.
Wear appropriate personal protective equipment (PPE), including safety glasses, gloves, and hearing protection; Be aware of potential hazards like hot surfaces, moving parts, and electrical shock. Failure to follow these precautions could result in serious injury or property damage. Refer to the detailed safety sections within this manual.

General Safety Rules
Strictly adhere to all local, state, and national codes regarding fuel gas and electrical installations. Always assume all gas lines are live with fuel and electrical systems are energized until positively verified otherwise. Keep the burner area clean and free of combustible materials – a minimum clearance of 2 feet is required.
Never modify the burner or its components without explicit authorization from the manufacturer. Regularly inspect all connections for leaks or damage. Ensure all safety devices, such as flame sensors and gas valves, are functioning correctly.
Immediately report any unusual noises, smells, or operating conditions. Post emergency shutdown procedures prominently near the burner. Do not attempt repairs beyond your skill level; contact a qualified technician. Proper grounding is essential to prevent electrical hazards.

Specific Hazards & Warnings
High Voltage: The burner system contains high-voltage components. Never access internal parts while energized. Gas Leaks: Natural gas and propane are flammable and explosive. Immediately shut off the gas supply and ventilate the area if a leak is suspected.
Hot Surfaces: Burner components reach extremely high temperatures during operation. Avoid contact to prevent severe burns. Carbon Monoxide: Incomplete combustion can produce deadly carbon monoxide. Ensure adequate ventilation and install CO detectors.
Flame Impingement: Do not obstruct the flame pattern. Impingement can cause overheating and damage. Explosion Risk: Improper purging of the gas line can lead to a dangerous explosion. Follow purging procedures precisely. Always wear appropriate personal protective equipment (PPE).
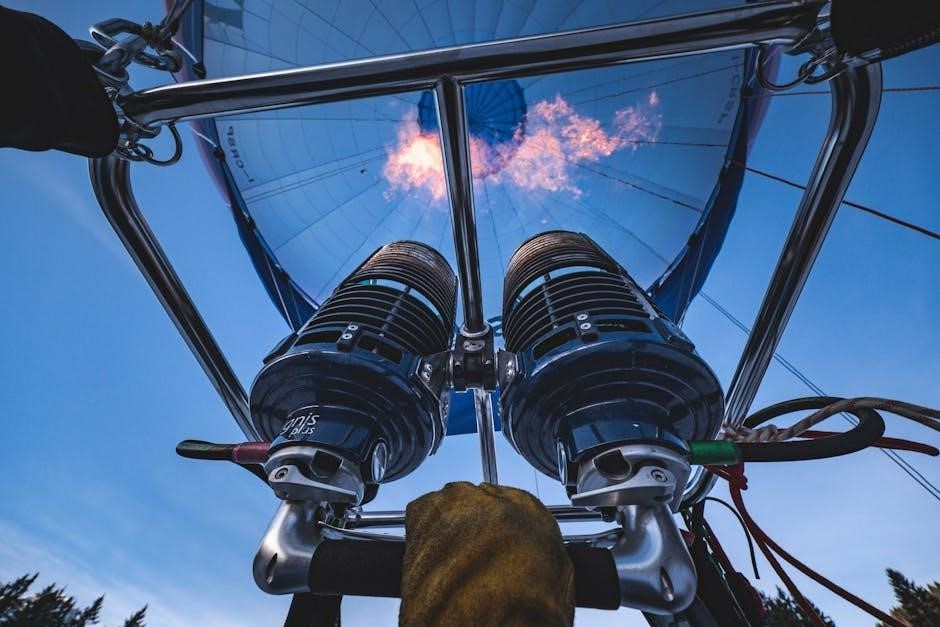
Burner Components & Identification
Understanding your Power Flame burner begins with component familiarity. Key elements include the burner head, responsible for flame production, and the gas valve, controlling fuel flow. The air shutter regulates air-to-fuel mixture, impacting combustion efficiency.
Essential parts also encompass the igniter, initiating the flame, and the flame sensor, confirming flame presence for safety. The control panel houses the system’s brain, managing operation. The fuel supply line delivers gas, while the electrical wiring provides power.
Refer to the detailed exploded view diagram (Figure 1) for precise location and identification of each component. Proper identification is crucial for maintenance and troubleshooting. Always use genuine Power Flame replacement parts.

Main Burner Assembly
The main burner assembly is the heart of the combustion process. It consists of the burner head, diffuser, and often a sight glass for flame observation. The burner head features multiple ports or nozzles, designed for optimal fuel-air mixing and stable flame propagation.
The diffuser ensures even distribution of air across the burner head, preventing localized overheating and promoting complete combustion. Regularly inspect the burner head for obstructions, such as dust or debris, which can affect performance.
Ensure proper alignment of the burner assembly within the combustion chamber. Misalignment can lead to inefficient burning and potential safety hazards. Caution: Allow the assembly to cool completely before any inspection or maintenance. Refer to Figure 2 for a detailed breakdown of the assembly.
Control Panel Overview
The control panel is the central interface for operating and monitoring the Power Flame burner. It typically includes a power switch, flame sensor indicator, safety reset button, and various operational status lights. Familiarize yourself with the function of each control before operation.
The flame sensor indicator illuminates when a stable flame is detected. A flashing light may indicate a fault condition. The safety reset button must be pressed after a safety shutdown to attempt re-ignition.
Digital displays, if present, show parameters like gas pressure, air flow, and burner status. Caution: Never bypass or disable any safety features on the control panel. Refer to Figure 3 for a labeled diagram of the control panel components and their respective functions.
Installation Procedures
Proper installation is crucial for safe and efficient burner operation. These procedures must be followed by qualified personnel adhering to local codes and regulations. Begin by carefully unpacking the burner and verifying all components are present against the parts list. Ensure the mounting surface is clean, level, and capable of supporting the burner’s weight.
Before commencing installation, disconnect all power sources. Incorrect wiring or gas connections can lead to hazardous situations. The burner should be positioned with adequate clearance for maintenance and ventilation. Securely mount the burner using appropriate fasteners, ensuring a stable and vibration-free installation.
Always consult the detailed installation diagrams provided for specific model configurations.
Pre-Installation Checklist

Before beginning the installation process, verify the following: Confirm the gas supply matches the burner’s rating plate specifications – natural gas or propane. Inspect the gas piping for leaks using a soap solution; never use an open flame. Ensure the electrical supply voltage and frequency are compatible with the burner’s requirements.
Check that the venting system is appropriately sized and installed according to local codes, providing adequate draft for combustion gases. Verify the availability of necessary tools, including pipe wrenches, electrical testers, and safety equipment. Confirm a qualified technician will perform all connections and commissioning procedures.
Finally, review the complete burner manual and understand all safety precautions before proceeding.
Gas & Electrical Connections
Gas Connection: Utilize a qualified technician to connect the gas supply line, employing approved piping materials and techniques. Apply gas-rated pipe sealant to all threaded connections. Perform a thorough leak test with soap solution after connection, before energizing the burner. Ensure the gas shut-off valve is readily accessible.
Electrical Connection: Disconnect power before making any electrical connections. Verify proper grounding according to local electrical codes. Connect the power supply wires to the designated terminals on the control panel, matching voltage and polarity. Double-check all wiring connections for tightness and security.
Warning: Improper gas or electrical connections can create hazardous conditions.
Initial Startup & Commissioning
Pre-Startup Check: Before initial startup, re-verify all gas and electrical connections, ensuring they are secure and compliant with safety standards. Confirm the burner assembly is correctly installed and all access panels are properly secured. Inspect the fuel supply for any obstructions or leaks.
System Verification: Cycle the burner through a manual firing sequence, observing for proper ignition and stable flame characteristics. Monitor the flame pattern for symmetry and color, indicating efficient combustion. Check for any unusual noises or vibrations during operation.
Record Keeping: Document initial readings of gas pressure, voltage, and current for future reference and troubleshooting.
Purging the Gas Line
Critical Safety Step: Before lighting the burner for the first time, or after any gas line maintenance, thoroughly purge the gas line to remove air; Air in the line can create a dangerous explosion hazard.
Purge Procedure: Open the gas supply valve slowly. Using the burner’s purge cycle (if equipped), or by manually operating the gas valve in short bursts, allow gas to flow through the line and vent to atmosphere. Continue purging until the smell of gas is consistently present, indicating all air has been removed.
Verification: Ensure adequate ventilation during purging. Never use an open flame to check for gas leaks; use a leak detection solution. Confirm complete purging before proceeding to ignition.
Setting Air/Fuel Ratio
Optimal Combustion: Achieving the correct air/fuel ratio is crucial for efficient combustion, minimizing emissions, and preventing burner damage. Refer to the burner’s nameplate for the manufacturer’s recommended settings as a starting point;
Adjustment Process: Utilize the air shutter or adjustable air intake on the burner. Slowly adjust the air intake while observing the flame characteristics. A properly adjusted flame will be stable, blue, and relatively quiet, with minimal smoke or yellow tipping.
Combustion Analysis: For precise tuning, employ a combustion analyzer to measure flue gas components (O2, CO, CO2). Adjust the air/fuel ratio until optimal levels are achieved, adhering to local regulations and safety standards.
Operating Instructions
Normal Operation: Once commissioned, the burner should operate automatically based on the thermostat or control system settings. Verify the main gas supply is open and electrical power is connected before initiating a call for heat.
Monitoring: Regularly observe the burner during operation. Listen for unusual noises, and visually inspect the flame for stability and proper color. The control panel displays operational status and any error codes.
Emergency Stop: Familiarize yourself with the location of the emergency stop button. In case of any malfunction or unsafe condition, immediately press the emergency stop to shut down the burner. Do not attempt repairs without proper training.

Routine Maintenance
Preventative maintenance is crucial for reliable burner operation and extends its lifespan. Adhere strictly to the provided checklists for daily and monthly tasks.

Daily Checks: Inspect for gas leaks using a suitable solution, verify proper flame characteristics, and confirm the control panel displays normal operating parameters. Log any anomalies.
Monthly Tasks: Thoroughly clean the burner components, including the nozzle and air intake. Check and tighten all electrical connections. Inspect the gas valve for corrosion or damage. Verify the functionality of safety shut-off devices. Keep detailed maintenance records.
Qualified Personnel: Complex maintenance should only be performed by trained and certified technicians.
Daily Inspection Checklist
Before each operational shift, complete the following checklist to ensure safe and efficient burner performance. Gas Supply: Verify no gas leaks around connections (use approved leak detection fluid). Flame Observation: Confirm a stable, consistent flame pattern – note any flickering or unusual colors.
Control Panel: Check for error codes or abnormal readings on the control panel display. Air Intake: Visually inspect the air intake for obstructions (dust, debris). Safety Devices: Briefly test the functionality of the flame safety system (observe proper shutdown upon flame loss).
Record Keeping: Document all inspection findings in the maintenance log. Any discrepancies must be addressed immediately before continuing operation. Personnel Safety: Ensure all safety guards are in place.
Monthly Maintenance Tasks
To maintain peak performance and prevent issues, perform these tasks monthly. Burner Nozzle: Inspect and clean the burner nozzle, removing any carbon buildup or obstructions. Air Filter: Replace or clean the air filter to ensure proper airflow. Gas Valve: Check the gas valve for smooth operation and leaks – consult a qualified technician for repairs.
Control System: Verify calibration of safety controls and sensors. Electrical Connections: Tighten all electrical connections within the control panel and burner assembly. Flame Sensor: Clean the flame sensor to ensure reliable flame detection;
Record Keeping: Log all maintenance performed, including parts replaced. Schedule professional inspection annually for comprehensive system evaluation.
Troubleshooting Common Issues
This section assists in diagnosing frequent burner problems. No Ignition: Check gas supply, ignition transformer, and flame sensor. Flame Instability: Verify gas pressure, air/fuel ratio, and nozzle condition. Sooting: Indicates incomplete combustion – adjust air/fuel mixture or clean burner components.
Loss of Flame: Inspect flame sensor, gas valve, and safety controls. Excessive Noise: May indicate a problem with the gas valve or fan motor. Control System Lockout: Review error codes and consult the control system manual.
Important: If you are uncomfortable performing any troubleshooting steps, contact a qualified technician. Do not attempt repairs beyond your expertise. Always prioritize safety!

Flame Instability & Loss of Flame
Flame instability, appearing as flickering or lifting, often stems from insufficient or excessive air. Check the air shutter adjustment and ensure proper airflow to the burner. Loss of flame is a critical safety concern. First, verify the gas supply is active and at the correct pressure.
Inspect the flame sensor for cleanliness and proper grounding – a dirty sensor frequently causes false flame failure signals. Examine the ignition transformer for weak spark output. A faulty gas valve can also interrupt gas flow, leading to flame loss.
Caution: Repeated flame loss indicates a serious issue. Do not repeatedly attempt to relight the burner without addressing the underlying cause. Contact a qualified technician for assistance.
Control System Errors
Control system errors manifest as fault codes displayed on the burner’s control panel. Refer to the detailed error code list in the appendix of this manual to decipher the specific issue. Common errors include low gas pressure switches failing, high limit switch activations, and issues with the flame safety relay.
Verify all wiring connections to the control panel are secure and free from corrosion. A failing control module can also generate erroneous codes; testing may require specialized equipment. Important: Do not attempt to bypass safety interlocks or modify control system settings without proper training.
Warning: Ignoring control system errors can lead to unsafe operating conditions. Consult a qualified technician for diagnosis and repair of complex control system faults.
Parts List & Ordering Information
Maintaining a supply of essential replacement parts is crucial for minimizing downtime. This section details commonly replaced components, including nozzles, filters, igniters, flame sensors, and control modules. Refer to the exploded view diagram (Section 3) for part identification.
To order parts, contact your local Power Flame distributor or visit our website at [insert website address here]. Please have the burner model number and serial number readily available when placing your order. Specify the part number as listed in the table below for accurate fulfillment.
Warranty Information
Power Flame extends a limited warranty to the original purchaser against defects in materials and workmanship. This warranty covers parts and labor for one year from the date of installation, but not exceeding eighteen months from the date of shipment. Proper installation and adherence to the guidelines outlined in this manual are essential for warranty validity.
The warranty is void if the burner has been subjected to misuse, negligence, unauthorized modifications, or improper maintenance. Damage resulting from incorrect gas pressure, inadequate ventilation, or use of non-approved parts is also excluded.
To make a warranty claim, contact your Power Flame distributor or our customer service department. Proof of purchase and a detailed description of the defect are required. Warranty service will be performed by an authorized Power Flame service technician.